
DC removal
What problem are you trying to solve?
We want to create a speech detector that can distinguish between speech and background noise. Our goal is to isolate moments of speech from all the noises in a WAV file.
The objective is to determine which parts of an audio file contain speech and which parts contain silence or background noise. This is useful in various applications, such as speech recognition, audio indexing, and improving the efficiency of communication systems by ignoring non-speech segments.
Input - WAV signal
Processing - Speech detection
Output - Binary signal indicating speech/loud noise.
The output will be a vector of zeros and ones indicating moments of silence/background noise versus clear speech, respectively.
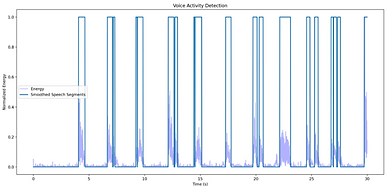
Additionally, we will generate a graph illustrating the results:
The graph shows whether speech was detected (1) / speech was not detected (0) over time, and also displays the signal's energy level relative to time.
How does the code solve the problem?
We will briefly describe the code's operation and then explain each part separately:
The algorithm in brief:
The algorithm in this code is a Voice Activity Detection (VAD) algorithm. It analyzes the audio and determines which parts contain speech and which do not.
Operation:
- Read the audio data and remove the DC component (if this option is selected).
- Split the audio into frames.
- Calculate and normalize the energy of each frame.
- Detect speech frames based on an energy threshold.
- Smooth the detection results according to the aggressiveness level.
- Generate graphs and print information about speech frames.
We will provide a step-by-step explanation of what the code does and how it solves the problem:
Reading the Audio File
This step involves reading the audio file, converting the data into a numpy array, and, if the file is stereo, converting it to mono.
This is done using the defined function: read_wav.
Input: The path to the WAV file we want to read.
Output:
1. audio_data: A numpy array containing the audio data from the WAV file. If the file was stereo, this array contains the average of the two channels (i.e., mono). The array is of type int32 for further processing.
2. frame_rate: The sample rate (number of samples per second) of the audio file. This is an integer representing how many samples are taken per second from the audio.
Operation:
Step 1: Open the WAV file for reading
Using wave.open to open the WAV file for binary reading.
The file is opened in binary mode to read the raw content of the file as stored on disk. This is especially important for files like audio files, where the data is stored in a compressed or encoded format that is not directly readable by humans.
In the case of a WAV file, reading in binary mode allows for reading the digital audio data directly without attempting to interpret it as text. This ensures that the data is not altered or unexpectedly processed during the read operation.
Step 2: Get basic file information
We want to obtain information about the WAV file:
n_channels: Number of channels in the file (mono or stereo).
sample_width: Sample width in bytes.
frame_rate: Sample rate (number of samples per second).
n_frames: Number of frames in the file.
Step 3: Read raw audio data
Read all the audio frames from the file.
Step 4: Convert raw data to numpy array
First, determine the data type (dtype) based on the sample width:
If the sample width is 1 byte, the data type is int8. If the sample width is 2 bytes, the data type is int16. Other sample widths are not supported.
Then, convert the data to a numpy array according to the determined data type.
Step 5: Handle stereo audio
If the WAV file is stereo (2 channels), the array is converted to mono by averaging the two channels.
Step 6: Convert data to int32
Convert the array to int32 type for further processing.
Step 7: Return the data
The function returns the audio data and sample rate.
Removing DC Component (Optional):
This operation depends on the user's choice. If this option is selected, the DC component is removed from the audio by subtracting the average from the audio data.
Removing the DC component (Direct Current component) from audio is done by calculating the average of the values in the audio signal and subtracting this average from each value in the signal. The DC component is essentially a constant component in the signal that can shift the entire signal up or down on the vertical axis, and it is usually a result of measurement or equipment issues. Removing this component can improve the quality of the signal for many purposes.
This is done using the defined function: remove_dc_component.
Input: audio_data: A numpy array containing the audio data. The array type is np.int32.
Output: ac_component: A numpy array containing the audio data after removing the DC component, i.e., the audio data after subtracting the average from each value.
Operation:
Step 1: Calculate the DC component
The DC component is calculated by computing the average of the values in the audio signal.
Step 2: Remove the DC component
Subtract the average from each value in the audio signal to remove the DC component.
Splitting the Audio into Frames:
Done by the defined function: vad
The audio is divided into fixed-size frames, based on the frame duration (e.g., 10 milliseconds).
The vad function ensures that each frame contains the same number of samples, allowing for efficient and accurate processing of the audio.
It updates the class variables so that they contain the energy of each frame and whether a specific frame contains speech or not. The function does not take parameters directly and does not return values directly but operates on the class variables.
Input/Output: None
Operation on class variables:
The vad function does not return values directly but updates the following class variables:
1. self.energy: A numpy array containing the normalized energy values for each frame.
2. self.speech_segments: A boolean numpy array representing which frames are considered as speech (True) and which are not (False), according to a defined threshold.
Operation:
Step 1: Calculate frame size
The frame size is calculated by multiplying the sample rate by the frame duration.
Step 2: Pad the audio data
To ensure that all frames are of equal size, padding is added to the end of the array if necessary.
The code calculates how many samples remain at the end of the array that are not enough for a full frame and adds padding to the end of the array to achieve a full frame (pad_size).
Step 3: Split audio data into frames
After padding, the audio data is split into equal-sized frames by reshaping the array.
Reshaping the array means that each row in the new array represents one frame of audio data.
Step 4: Convert frame data to float32
This is done to ensure accuracy during mathematical calculations (provides decimal precision) and to avoid overflow issues when squaring the values.
This conversion is critical for accurate and stable energy calculations for each frame.
Explanation of Step 1:
In our code, the duration of each frame is defined by the frame_duration parameter when creating a VoiceActivityDetector object.
Its default is 0.01 seconds, i.e., 10 milliseconds.
When creating a VoiceActivityDetector object, this default value can be changed as needed.
vad = VoiceActivityDetector(audio_file, frame_duration=0.01, threshold=0.1, aggressiveness=aggressiveness, remove_dc=bool(remove_dc))
Within the vad function, the duration of each frame is calculated as follows:
frame_size = int(self.frame_rate * self.frame_duration)
Here, self.frame_rate is the sample rate (number of samples per second), and self.frame_duration is the duration of each frame in seconds (in this case, 0.01 seconds).
For example, if the sample rate is 44,100 samples per second (44.1 kHz), the frame size will be:
frame_size = int(44100 * 0.01) = 441 samples per frame
In other words, each frame will contain 441 samples representing 10 milliseconds of audio.
Calculating the Energy of Each Frame:
The energy of each frame is calculated by summing the squares of the values in the frame and dividing by the number of samples in the frame.
The energy of a signal reflects its power and is used to measure voice activity.
The energy for each frame is calculated by summing the squared values of the samples in each frame and normalizing by the frame size to get an average energy value for each frame.
The energy of a signal reflects its power and is used to measure voice activity.
This is done by the defined function: vad
Operation:
Step 1: Square the values in each frame - Each sample in a frame is squared to emphasize higher values and reduce lower values.
Step 2: Calculate the sum of squares - For each frame, the sum of squared samples is computed.
Step 3: Normalize - Divide the sum of squared samples by the frame size to get an average energy value for each frame.
The result is a measure of the signal's strength in each frame, which is used for detecting voice activity.
Normalizing the Energy:
Normalization of energy is done to ensure that all energy values are in the range between 0 and 1, making it easier to compare and detect speech segments. This is done by dividing the energy values by the maximum energy value across all frames.
This is done by the defined function: vad
Operation:
Step 1: Calculate the maximum energy value in the energy array.
This value is found using the np.max function and is stored in the max_energy variable.
This variable is used in the next step to normalize energy values.
Step 2: Normalize energy: Each value in the self.energy array is divided by the maximum energy value, max_energy.
If the maximum value is zero, division by zero is avoided and values are left as they are.
Detect
ing Speech Frames:
The speech frames are detected based on a predefined energy threshold. If the energy of a frame exceeds this threshold, it is classified as containing speech.
The defined function: vad
Operation:
Step 1: Compare normalized energy with threshold: Each frame’s normalized energy value is compared to the predefined threshold value.
Step 2: Update speech_segments: Based on the comparison, the boolean array self.speech_segments is updated, marking frames with energy above the threshold as speech (True) and below the threshold as non-speech (False).
Smoothing Detection Results:
The results of the speech detection are smoothed to account for small fluctuations and improve the robustness of the detection. This is done using a simple smoothing technique, such as a moving average filter or median filter, depending on the aggressiveness level set by the user.
The defined function: vad
Operation:
Step 1: Calculate smoothing window size based on aggressiveness level.
The aggressiveness level determines how much smoothing is applied. Higher levels result in more smoothing.
Step 2: Apply smoothing to the speech_segments array to reduce fluctuations and make the detection more robust.
The smoothed results are used to generate the final binary output indicating moments of speech.
Generating Graphs:
Finally, the results are visualized using graphs that illustrate whether speech was detected or not over time and show the energy level of the signal.
This is done by the defined function: plot_results
Operation:
Step 1: Plot the energy level over time.
Using matplotlib, the energy values for each frame are plotted as a function of time.
Step 2: Plot the speech detection results.
The binary speech detection results are plotted to show the moments where speech was detected (1) versus silence or background noise (0).
Overall, the code is a comprehensive implementation of a Voice Activity Detection system that processes audio data to detect and visualize speech activity by analyzing energy levels, applying thresholds, and smoothing results.
What are the parameters' names and uses?
- `self.audio_file:` The name of the audio file (input) to be played.
- `self.audio_data:` The array of audio data, also known as sound data.
- `self.sampling_rate:` The sampling rate of the audio, in Hertz.
- `self.num_samples:` The number of samples in the audio.
- `self.num_channels:` The number of channels in the audio (e.g., stereo).
- `self.normalized_audio_data:` The audio after normalization and removal of the DC component.
- `self.energy:` An array of the energy for each frame in the audio.
- `self.max_energy:` The maximum energy value across all frames.
- `self.speech_segments:` A boolean array representing the detection of speech frames.
- `self.smoothed_speech_segments:` A boolean array representing the speech detection results after smoothing.
- `self.look_back:` The number of previous frames to be checked if needed for smoothing results.
- `self.plot_title:` The title for the graph displaying the audio data.
- `self.plot_xlabel:` The label for the X-axis in the graph displaying the audio data.
- `self.plot_ylabel:` The label for the Y-axis in the graph displaying the audio data.
- `self.plot_xlim:` The X-axis limits for the graph displaying the audio data.
- `self.plot_ylim:` The Y-axis limits for the graph displaying the audio data.
- `self.fig_size:` The size of the graph.
- `self.plot_audio_fig:` The figure for the graph displaying the audio data.
- `self.plot_energy_fig:` The figure for the graph displaying the energy of the frames.
- `self.plot_vad_fig:` The figure for the graph displaying the voice activity detection results.
- `self.plot_title_vad:` The title for the graph displaying the voice activity detection results.
Section Title
Section Subtitle
Every website has a story, and your visitors want to hear yours. This space is a great opportunity to give a full background on who you are, what your team does and what your site has to offer. Double click on the text box to start editing your content and make sure to add all the relevant details you want site visitors to know.
If you’re a business, talk about how you started and share your professional journey. Explain your core values, your commitment to customers and how you stand out from the crowd. Add a photo, gallery or video for even more engagement.